Creating an Election Day Graphic
Saturday, November 20, 2004 at 10:16 pm | ![]() Comments off
Comments off
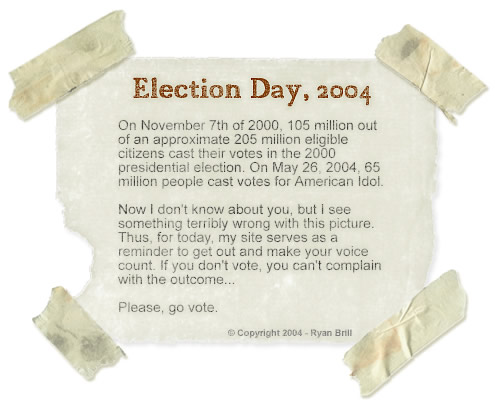
Since I was asked to write up a tutorial on how I created my election day graphic, I decided to take a bit of time and write the process I used to create it. It was made using a combination of Fireworks MX 2004 and Photoshop CS. I was in a hurry (I finished it the Monday night before the elections), so it's not as good as it could be...
Creating the paper background
The first thing I did was create the paper background. This was done in Fireworks by grouping an old paper mask with a color overlay. (Sorry, I can't remember where I downloaded the paper mask from - I seem to remember it being vbrush.temp.layout, but didn't see it there when I went to look for it.) In Fireworks, this is as easy as selecting both layers and then going to Modify -> Mask -> Group as Mask.


Next, I opened it in Photoshop, and used the Magic Wand Tool to select the paper and leave the solid background. I played around with the tolerance until it was selecting most of the paper, while leaving the background. Since it didn't select everything, I then I went back with the Rectangular Marquee Tool and selected the pixels that got left behind.
Finally, I added a bit of a drop shadow here, a bit of inner glow there, and viola, the paper background.

That precious tape

Ok, so I know what you're really wondering about is the tape. Yes, the tape. Well, iStockphoto.com has been called "the designer's dirty little secret", and so it is. The tape was taken from this photo. All I did was remove the lined notebook paper background, touch up the tape (you could see the lines through the tape in certain areas), and use the same method as above to select the tape (combination of Magic Wand and Rectangle Marquee).
Now that I had the tape selected, I promoted it to a new layer, where I was able to add the drop shadow. I also wasn't happy with the color of the tape, as it didn't match my paper color very well, so I added a color overlay to tweak the colors a bit. Once I was happy with them, I simply positioned the tape over corners of the paper background. Yep, that's it. Too easy, eh?
Adding text
Finally, I re-exported to Fireworks where I added the text. I went back to iStockphoto.com and grabbed this image, which I used as a mask over the text. I added a smidgen of glow to the text, so it wasn't quite as sharp on the page. I added the header in a similar way (Election Day, 2004), except I added a sharpen filter to the text.
Final notes and image
I'm sure there are better ways to do some of what I did. I'm not overly familiar with Photoshop, as I tend to use Fireworks much more than Photoshop. Using one tool would have been preferable, but as I said, I was in a hurry and didn't have time to try to figure out how to use Photoshop for things I already knew how to do in Fireworks. Anyway, I'm pretty happy with the outcome - not bad for a couple of hours of work.

Comments
Wow, thanks for putting in the time to do this Ryan :) I'm sure me and many others appreciate it.
I should use iStock Photo sometime, very nifty.
Thanks, Ryan, for that. This information will definitely be of help in the future. In fact, I plan on experimenting a bit with this technique right now.
nice write up Ryan ... especially the tape ... I always wondered how people got the tape to look so real ... thanks for taking the time to write that up ...
That image is pretty cool!
Comments are automatically closed after 45 days
November 20th, 2004
11:07 PM | #
Logically, shouldn't that paper be flopping down towards the ground? The tape on the top OBVIOUSLY isn't touching the paper, so what's holding the paper up?? I think you need to remove the drop shaddow from the two top pieces ;)
And gee, I need Photoshop... so many cool things you can do with it.